Tuesday, June 30, 2009

Buffalo Small Strobes, Big Results

What a fun time we had at the recent Small Strobes, Big Results Workshop in Buffalo, NY. I would like to extend a special thanks to our hosts, Alyssa & Rich of Nickel City Studios as well to Derek Punaro for allowing us to photograph at the historic Central Terminal Train Station.

We had two fantastic models to photograph throughout the day, thanks to Ann & Andrew for all your help and effort. The above photo of Anne was lit using the new FourSquare™ softbox with one SB-800 inside, as well as 2 SB-800 with full cuts of CTO's as kickers.

Here is photo of the set up for the above photo.

This photo (below) was shot demonstrating a bounce technique, creating a soft directional light.

The photo below, was one of the first photos we did when we arrived on location at the train station. I used a 5 foot Octa with one SB-800 and another SB-800 with a full cut CTO as a kicker from camera right. There was also another SB-800 used to put some light up at the American Flag.


In the photo below, I used 4 SB-800's to light the photo. One used with a grid for the key light on Ann's face and the other 3 where snooted to contain the light and directed to her hands and feet.

I sure had a lot of fun on this workshop, thanks to all that attended and I wish all of you great success with your future lighting.

If you would like to host a Small Strobes, Big Results Lighting workshop in your city, please let me know. I am looking for fun and interesting locations to conduct my workshops. If you think you have an interesting location and want to learn more about hosting a workshop, just email me and we'll see if we can make it work.

Octa Quad Ring

After playing around with the new FourSquare a few days now, I decided to mount 4 cold shoes to the inside of an Octa Speed Ring I have. Mounting these 4 cold shoes on this speed ring will allow me the ability to use a larger modifier as well as the ability to preform high speed sync shots with greater efficiency.

The photo above shows the placement of the cold shoes and the photo below gives you a view from the rear. These four strobes should produce a good bit of light, whether using normal or high speed sync.

Monday, June 15, 2009

Bring On The Lights... a lot of them


A few weeks back, I shot a project for a design firm that I've worked with for years. It's the same firm I shot the lab technician wearing the National Jewish Health coat.

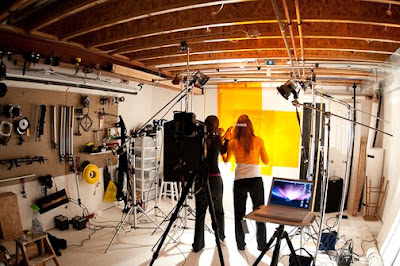
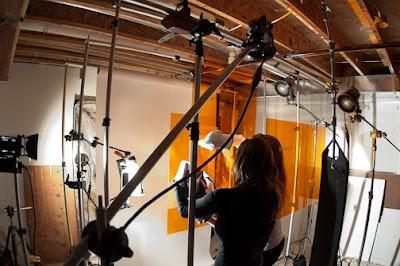
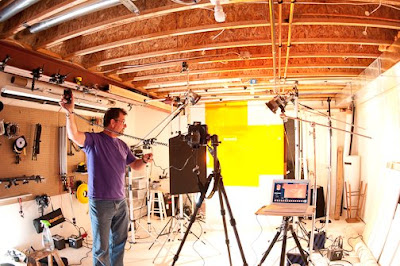
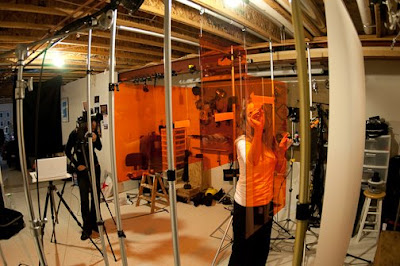
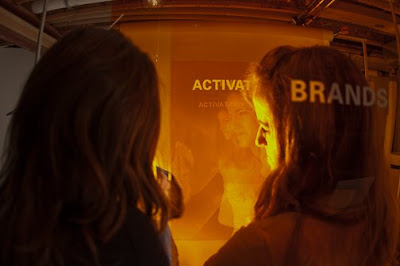
I was asked to create a cover shot for the design firms new capabilities brochure. The cover shot was a series of words placed on 3 different pieces of orange Plexiglass. The first sheet of plexiglass had the word BRANDS, the second sheet ACTIVATING and the third BUILDING AND. The first sheet with the word BRANDS was sharp and the rest of the word progressively became more out of focus by use of controlling my depth of field. I controlled the depth of field (DOF) by moving the sheets backselecting an f-stop that produced the effect we where looking for. This was a difficult shot to produce and it required most of the lights I own. Here is a look at the set up.

Like the previous project, I was provide a Photoshop file which served as a frame for which the image I was shooting was to fit in.


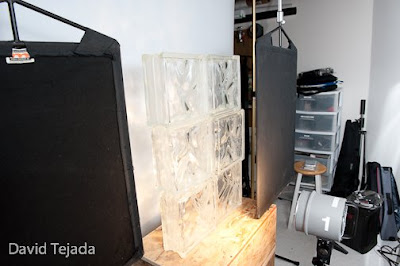
Let's walk through the set up and how this all fits together. I used 2 background poles and one boom to suspend each sheet of plexi sheet from. This allowed me the added control of height and distance of each sheet. The background was a sheet of translucent material which I was able to project light through and allowed me to create a pattern or texture to the light.

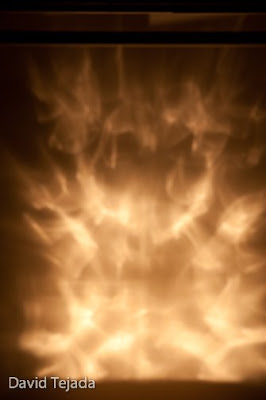
I ended up using a total of 9 glass bricks in order to create enough pattern onto the background of the final image. This is what the pattern looked like from the front and in far more focus than in the final image. Kinda looks like fire to me.

We started out using a black cloth behind the camera position to block out unwanted reflection on the sheets of plexiglass. After looking at several test images, we realized we need some life put back into the image. We found that the reflections of lights behind the camera added just what we needed, almost. The reflection of lights in the upper right corner of the image are from the ceiling lights and the ones on the left just below and to the left of the word BRANDS were created with 2 SB-800's.

The lights on the ceiling where quite bright, I used neutral density gels to knock them down a bit. I had to do the same with the two SB-800's even though they were dialed down to 1/128 power. The SB's were not contributing to the exposure, their sole purpose was just to provide a reflection.


In order to get the SB-800's to fire, I used my SC-29 cord connected to my SU-800 command unit. I needed to do so because the strobes where positioned behind the camera.

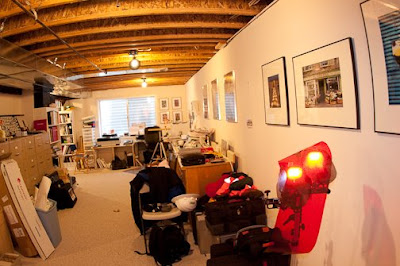
The lighting on the final shot required 5 Dynalite heads (modeling lights only), one Dedo light, one Tota-light and 2 SB-800's. I was running out of lights as well as space in my basement studio. You can see the wall behind me has been stripped clean, most of that gear is being used.

Here are just a few more images of the production as well as the final image.


Saturday, June 13, 2009

Light Painting with Dave Black

Last night Dave Black and I conducted a light painting session for 2 groups of the Mentor Series Trek in Arches National Park. Dave has been light painting for years and he's a real pro at it.

The photo above was my first attempt as a test prior to the workshop participants arrival. The exposure was 30 seconds long, f/8 @ ISO 400. We used two, 2 million candle power flash lights to illuminate the rocks.

The photo below was taken just before we wrapped things up. I busted the ISO to 4000, 30 second exposure at f/3.5. The only illumination on the rocks was supplied by 2 cars passing by our location. On the right side of the frame you can see the glow of the city lights of Moab.

I got to bed last night at midnight and was up at it again this morning at 3:30 AM. We had a beautiful sunrise this morning at North Window Arch and we'll have another light painting session this evening. I'm having a wonderful time here, if you have never attended a Mentor Series Trek you should look into it. They have wonderful destinations to choose from and a great staff of people to insure that these treks are really successful.

Time for a 2 hour nap before heading out again. DT

Thursday, June 11, 2009

Slickrock

It's late and I'm tired. It's been a long day out here on the "Mentor Series" Arches Nat. Park Trek. I'm having a blast, and we have a wonder group of trekkers and well as Mentors. We had an hour and a half up at Slickrock to photograph biker using our small strobes.

The biker shown above was lit using the new FourSquare™ softbox. I had one strobe inside the FourSquare™ and I fired the strobe using my new Radio Popper's. I'll have more to say about these Poppers in a later post, in a word WOW!

Good night.

Mill Canyon

Here is another photo from my drive to Moab, UT the other day. I took a short drive up a dirt road to Mill Canyon to capture the above image. These beautiful rock formations we're my first indication of what Arches National Park was going to be like. More as they come out of the camera. DT

Wednesday, June 10, 2009

Arches Mentor Series Trek

I'm currently in the beautiful state of Utah! My second Mentor Series workshop with Popular Photography is underway. Will be shooting in the Arches National Monument just north of Moab, UT.

Shot this photo just west of Green River, UT yesterday. Big open spaces out here, just beautiful out here. If you have not had the opportunity to visit Utah or Arches in particular, do yourself a favor and just do it. DT

Saturday, June 06, 2009

Denver Pro Photo Workshop


I would like to expend a very special thanks to Abby for modeling at today's Small Strobes, Big Results workshop. Also a big thanks to Denver Pro Photo for sponsoring the event.

This lovely photo of Abby was lit using 3 SB-800 strobes. I set the color balance on the camera to tungsten, I put a full CTO gel on the main (this brings the color temp of the light to neutral), 1/2 CTO on the hair light and a full CTB for the blue background. The background is a bit richer due to the tungsten white balance being set on the camera.

We had a great day today and Denver Pro Photo has a great facility to hold such events, thanks guys. DT

Thursday, June 04, 2009

Milling Around The Mill


Several days ago, I had an assignment to shoot some photos for use in a trade publication. The photos will be used to help illustrate an article about some sort of high speed milling bit.

The location I was shooting at was at a local Metals Fabrication business near Denver. Locations like these are not unfamiliar to me. I've had to shoot in these sorts of location for years, and digital has certainly made shooting under these conditions much easier.

I had a detailed list of the images the client wanted for the article. They have done about 40 similar articles in the past and they knew exactly what they wanted in terms of images.

When I walked into the location where the milling machine was located, I noticed a large wall that was perfect for bouncing a strobe off of. I was able to produce a large light source from the surface I was bouncing off of. You can see the size of the bounce here in the photo below. You should also notice that I used a flag or gobo to prevent the light from directly striking my subjects. I want the main light to come from the bounce surface only.


The above bounce light was used specifically for the people shots I needed to do in addition to the type of photos shown at the top of the post. The light coming into this shot from camera right is the bounced light, camera white balance is set to florescent and the strobe was gelled with a +green to balance with the ambient light in the shop. The hard light you see on the subjects right side (camera left) is from a strobe positioned for the bit shot at the top of the post.

You can see that I have included lots of ambient light in this photo. I can see from my EXIF data that the above photo had an ISO setting of 1250, 1/320 @ f/2.8

The photos of the actual milling process were handled a bit differently. I'm not really certain how fast the bit was turning, I knew that it was going to be the strobes that stopped the action. I lowered my ISO and set my sync speed to 1/250. I can't remember what power setting I had on the strobes (2 SB-800's) I set them as low as possible. The lower the power setting on a strobe the faster or the shorter the flash duration. With a short flash duration I am able to capture the small chucks of metal flying through the air.

I clamped to SB's to the milling machine, one of them with a full CTB gel over the flash head to provide a bit of color to the shot. Each strobe was clamped on either side of the machine, I also used some flags or gobo's to keep the light channeled where I wanted it.
Here are a series of images of the bit doing it's thing. Pretty cool to see the chunks of metal flying off the mill.

If your in the Denver area this Saturday, I'll be presenting a shorten version of my Small Strobes, Big Results workshop at "Denver Pro Photo". Just click on the link for more info.

Monday, June 01, 2009

Getting Nasty


I was introduced to a new piece of grip equipment this week, it's called the Nasty Clamp. It's a clever clamp that's perfect for positioning a small strobe where a stand just won't do.

The Nasty Clamp is a super strong "A clamp" with a flex-arm attached. The flex-arm is modular and can hold a maximum weight of about 1 pound. When the clamp is used in a under-slung position it will actually hold quite a bit more.

I have a pond in my backyard and I have used the Nasty Clamp to provide additional lighting when photographing frogs. As a matter of fact, I have 2 frogs that attack birds when they stop by to take a bird bath.


Nasty Clamps are made and build by some very Nasty people in Portland, Oregon. For more information about these cool clamps head over to their web site www.nastyclamps.com

OK. You wanted to see the Frog, actually there are two of them. Here is where the frog sits waiting for the next bird to land. I've been unable to photograph a successful attack only misses.

Below you can see that the frog has just made it's move, missing the bird by inches! Look closely, the frog is just behind the cattail and the bird is in flight. I'm going to photograph an actually catch one of these days. It's going to require the patients of a frog to get it.